Inferse is reader-supported. When you buy through links on our site, we may earn an affiliate commission. As an Amazon Associate I earn from qualifying purchases. Learn more
Experiencing 100% CPU usage can bring your Windows computer to a crawl, making it feel sluggish, unresponsive, and even causing programs to crash. When your Central Processing Unit (CPU) is constantly running at its maximum capacity, it indicates that one or more processes are hogging all its resources, preventing other tasks from executing efficiently. Learning how to check what is causing 100% CPU usage is the first crucial step to diagnose and resolve these performance bottlenecks, restoring your computer’s responsiveness.
Why Your CPU Might Hit 100% Usage
A CPU operating at 100% usage is a clear sign that something is demanding too much processing power. Common culprits include:
General shopping ads
- Resource-Intensive Applications: Heavy gaming, video editing, 3D rendering, or running complex simulations.
- Background Processes: Applications running in the background, system services, or even updates.
- Driver Issues: Corrupted or outdated device drivers can cause processes to malfunction and consume excessive CPU.
- Malware/Viruses: Malicious software can run rogue processes that secretly consume CPU cycles for mining cryptocurrency or other nefarious activities.
- System Errors: Corrupted system files or Windows update issues.
- Hardware Issues: Though less common, faulty hardware can sometimes manifest as high CPU usage.
- Too Many Startup Programs: A large number of applications launching automatically can overload the CPU at startup.
Step-by-Step Guide: How to Check What is Causing 100% CPU Usage
To pinpoint the exact cause of 100% CPU usage, Windows offers several built-in tools. We’ll start with the most common and move to more advanced diagnostic methods.
Shopping ad

- Dimensions: 7.5" x 4.3" x 2.2". Compact size and lightweight make it easy to carry and put into your backpack, handbags or laptop bag without taking much space. Suitable for family use and daily organization. Note: Small mesh pockets are ideal for charging cords no longer than 3ft; longer cables (over 3ft) fit better in the larger compartments
- Quality Material: This electronic organizer travel case made of high quality durable waterproof oxford and soft sponge inside to secure your gadgets in place and deliver a quick access whenever you want. Water-resistant fabric protects your gear from unexpected splashes, keeping all your electronic essentials safe and secure
- Double Layers Design: This tech pouch features a double-layer interior design with 8 compartments, including multiple see-through mesh pockets and ample space to store your cords, cables, USB drives, cellphone, charger, mouse, flash drive and more, keeping all accessories neatly organized and tangle-free
- Practical and Convenient: Comes with a comfortable hand strap for easy carrying; You may carry it in your hand when heading out. Durable and smooth zipper closure keeps your favorite device securely, convenient for you to have quick access to the items inside the case
- Portable and Lightweight: The small size and lightweight design durable cable organizer pouch is a perfect choice when going on holiday, business trip, travel, office. Enjoy hassle-free travel without wasting time on tangled accessories. Great gift for yourself also a nice share with families and friends. (No include cords, electronic accessories)
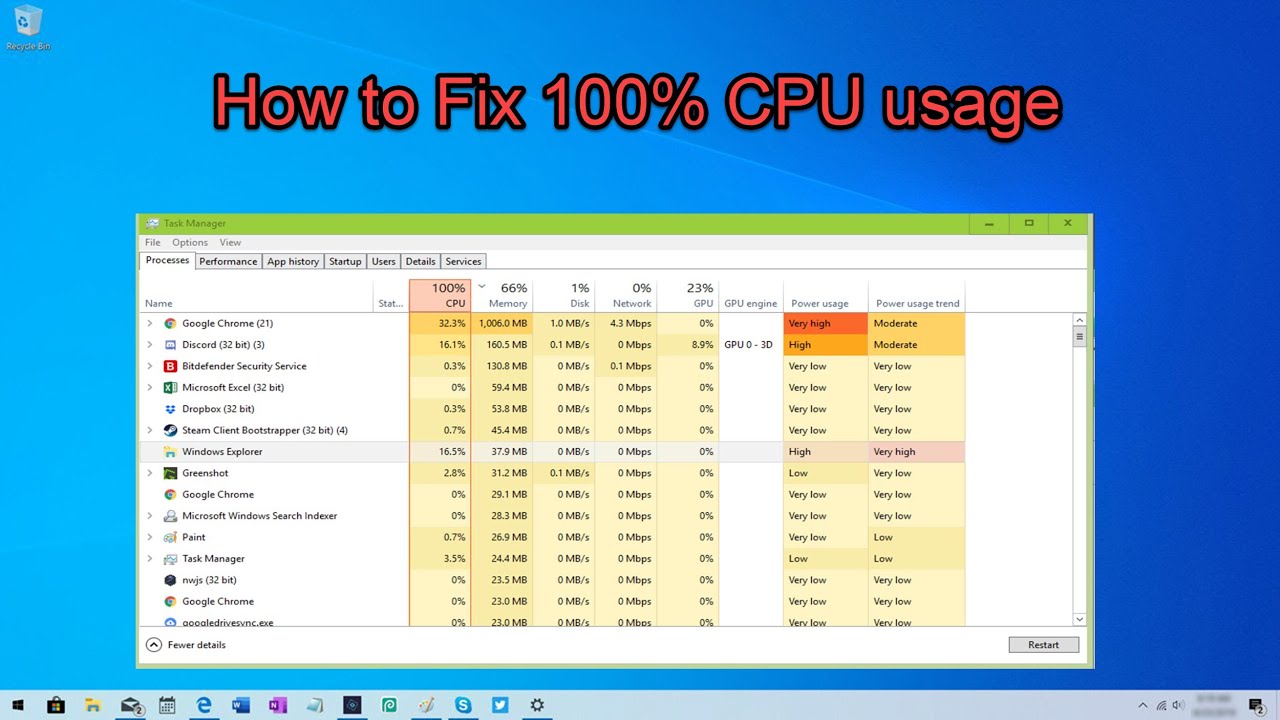
Step 1: Use Task Manager (Your First Stop)
Task Manager is the most direct and frequently used tool to identify processes consuming high CPU resources.
- Open Task Manager:
- Press Ctrl + Shift + Esc simultaneously.
- Alternatively, right-click on the taskbar and select “Task Manager.“
- If your screen is unresponsive, wait a moment. Sometimes, it might eventually open.
- Navigate to the “Processes” Tab:
- If Task Manager opens in a simplified view, click “More details“ in the bottom-left corner.
- Go to the “Processes” tab.
- Sort by CPU Usage:
- Click on the “CPU“ column header. This will sort all running processes by their CPU consumption, with the highest consumers at the top.
- You might need to click it twice to sort in descending order (highest to lowest).
- Identify the Culprit:
- Look at the processes at the top of the list. Is it a specific application you recognize (e.g., your web browser, a game, a video editor)?
- Is it a Windows service (e.g., “System,” “Service Host,” “Windows Update”)?
- Is it an unfamiliar process (potentially malware)?
- Take Action (Cautiously):
- For Applications: If it’s a known application that you’re actively using (e.g., a game), it might be legitimate 100% CPU usage. If it’s an app that shouldn’t be using that much CPU (e.g., a web browser with only a few tabs), try closing and reopening it.
- For Unresponsive Applications: Select the process and click “End task“ in the bottom-right. Be cautious with this, as unsaved work in that application will be lost.
- For System Processes/Services: Do NOT end system processes or “Service Host” entries unless you know exactly what you’re doing, as this can lead to system instability or crashes. If a system process is consistently high, it points to deeper issues like driver problems or malware.
Step 2: Investigate High “Service Host” Usage
If Task Manager shows “Service Host” or “System” consuming high CPU, it’s a general category that needs further investigation.
Shopping ad

- 【UPGRADED LAPTOP CLEANING KIT 】 The macbook cleaning kit computer screen cleaner comes with a number of accessories including a retractable large brush, polishing cleaning cloth X 2, keycap puller, metal pen tip, flocking sponge, thin soft brush, soft plastic lens cleaning pen, 5 replacing cloth, large cleaning microfiber cloth. You deserve the comprehensive computer cleaning kit keyboard vacuum at a low cost
- 【PROFESSIONAL KEYBOARD CLEANING KIT】 The laptop screen cleaner keyboard cleaner can pull out the keycaps of gaming keyboards and mechanical keyboards. A retractable keyboard brush works on laptops and keyboards, while the mini high-density brush is great for deep cleaning between keys for cleaning between flatter keys on a laptop, the metal pin tip gently removes any stains. This electronic cleaning kit macbook cleaner totally meets professional cleaning needs
- 【OFFICE DESK ACCESSORIES】This keyboard cleaner kit is easy to use and can clean your keyboard and electronic screen with just one swipe. Wiping with the 2mm thicken widen polishing cleaning cloth designed at a right angle for better fitting screen corners of computers with our recyclable cleaning spray, The laptop cleaner kit for macbook effectively absorbs stubborn stains, leaves no discoloration, no streaks, and no fiber shedding on the screens
- 【MULTIFUNCTIONAL TOOLS 】Mini soft brush and soft plastic lens cleaning pen are specially designed for DSLR camera screen, lens, and other delicate surfaces. 5 more cleaning cloths of it supplied for replacement. The flocking sponge is an excellent tool for cleaning earbuds charging cases, And the earbud cleaning kit is ideal. This electronics for college students is equivalent to 10 other electronic cleaning kit
- 【PORTABLE DESIGN & CLEANER TOOL】 The office supplies is compact in design, easy to carry, and you can easily take it anywhere. It's convenient to keep one in a drawer, one in your car, or in your bag and dorm. It is easy to use and can clean your keyboard and electronic screen with just one swipe. Is the college essentials cleaning tool for your friends, family, colleagues and students
- Expand “Service Host” Entries:
- In Task Manager’s “Processes” tab, “Service Host” often appears multiple times. Each entry groups several related Windows services.
- Click the arrow next to the “Service Host” entry that has high CPU usage to expand it and see the individual services grouped under it.
- Identify Specific Service: This will show you which specific service within that group is causing the high usage.
- Search for the Service: Search online for the identified service name (e.g., “WdiSystemHost high CPU usage”) to understand its function and common troubleshooting steps. Common culprits include:
- Windows Update: Especially after major updates or if updates are stuck.
- Superfetch/SysMain: Can sometimes cause high disk and CPU usage, particularly on HDDs.
- Windows Search/Indexing: If it’s rebuilding its index.
- Windows Defender: During a scan or update.
Step 3: Use Resource Monitor (For Deeper Dive)
Resource Monitor provides more detailed real-time information than Task Manager, especially for understanding resource usage across different components.
Free tools Windows power users keep installed
One-click scans. No signup required.
- Open Resource Monitor:
- In Task Manager, go to the “Performance” tab and click “Open Resource Monitor” at the bottom.
- Alternatively, press Win + R, type resmon.exe, and press Enter.
- Navigate to “CPU” Tab:
- In Resource Monitor, go to the “CPU“ tab.
- Processes are listed, and you can sort by “Average CPU” column.
- Analyze Individual Cores: Resource Monitor also shows individual CPU core usage at the top, which can sometimes reveal uneven load distribution.
- Suspend Process (Advanced): Right-clicking a process here gives you options like “Suspend Process,” which can temporarily halt it without ending it, allowing you to see if the CPU usage drops. Use this very cautiously and only for non-critical applications.
Step 4: Check for Driver Issues
Corrupted or outdated drivers can send a CPU into overdrive, especially after Windows updates or new hardware installations.
Shopping ad

- Compatible Space: This electronics organizer bag features 2 zippered mesh pockets fits phones, standard power banks, 4 elastic loop pouches for small items, 2 elastic loop pouches for wireless headphones and small chargers. Elastic loops for phone charging cable. And specific slots for SD cards. Please check the size to ensure it meets your needs
- Lightweight Travel Accessories: The size of the electronic organizer travel case is 10.6" L x 7.5" W x 1.2" H, Compact but substantial size fits your intended bag or space. Suitable for traveling use and daily organization
- Keep Everything Organized: This compact travel organizer features dedicated compartments for your phone charger, cables, and tech accessories, keeping them tangle-free and ready to go. You can find travel accessories quickly, no chasing cords in your pack anymore
- Durable Travel Essentials: Features double zippers for easy access, elastic loops with non-slip grips for daily protection. Organizer for office use and traveling, (Not including cords, electronic accessories). It can serve as a travel checklist. Before you leave a place, just open the case and check if everything is there, preventing you from leaving things behind
- Versatile Use: Its practicality and convenience make it a travel essential bag. It is suitable for a weekend trip, business trip, and travel. This organizer pouch is suitable for office, business, daily use and can be given as a gift for friends, family, or men, for birthdays, Valentine's Day, Christmas Day, Father's Day
- Check Device Manager:
- Press Win + X and select “Device Manager.”
- Look for any yellow exclamation marks next to devices, which indicate a driver problem.
- Update Drivers:
- Right-click on devices (especially Display adapters, Network adapters, Sound, video and game controllers, and Universal Serial Bus controllers) and select “Update driver.”
- For critical drivers (GPU, Chipset, Network), it’s always best to download the latest versions directly from the hardware manufacturer’s website (e.g., NVIDIA, AMD, Intel, your motherboard/laptop manufacturer).
- Roll Back Driver: If high CPU usage started after a recent driver update, try rolling back the driver in Device Manager (Properties > Driver tab > Roll Back Driver).
Step 5: Scan for Malware
Malware can cause hidden processes to run wild and consume CPU resources.
- Run a Full System Scan: Use your trusted antivirus software (Windows Defender or a third-party AV) to perform a full, deep scan of your entire system.
- Use a Second Opinion Scanner: Consider using a reputable free anti-malware scanner like Malwarebytes as a second opinion, as it might catch threats your primary antivirus missed.
- Remove Threats: Quarantine and remove any detected threats.
Step 6: Troubleshoot Windows Update Issues
Stuck or corrupted Windows updates can often lead to persistent 100% CPU usage.
Shopping ad
- Universal fit: ColorCoral cleaning gel, simple and convenient cleaning kits for PC/laptop keyboard and other rugged surface, such as the car vent, camera, printer, telephone, calculator, Instrument, speaker, air conditioner, TV and other appliances
- Safe cleaning gel: The keyboard cleaner gel is made from natural gel, no sticky to hands, smells sweet with lemon fragrance, no stimulation to skin
- Easy dust cleaning: Make sure your hands are dry and clean, knead the cleaning gel into a ball, press the cleaning gel slowly into the keyboard, car vent and rugged surface till the cleaning gel could touch the bottom and then pull out, the dust would be carried away with the cleaning gel
- Reusable: The keyboard cleaning gel could be used repeatedly till the color turn to dark or it become sticky, then you have to replace the cleaning gel with a new one. After cleaning, please stock the cleaning gel in cool place. (Note: Don’t wash the gel in water.)
- In the package: 1 can of universal cleaning gel, we provide the cleaning gel with brand new, if you find the package broken, the cleaning gel dirty, or any other quality issues, please email us through message, we provide you new one soon
- Check Update Status: Go to Settings > Windows Update (Windows 11) or Settings > Update & Security > Windows Update (Windows 10). See if any updates are stuck or failing.
- Run Windows Update Troubleshooter: In the Windows Update settings, look for “Troubleshoot” or “Run the troubleshooter.”
- Manually Restart Update Services (Advanced):
- Open Command Prompt as Administrator.
- Type net stop wuauserv and press Enter.
- Type net stop bits and press Enter.
- Navigate to C:\Windows\SoftwareDistribution and delete all contents of this folder.
- Type net start wuauserv and press Enter.
- Type net start bits and press Enter.
- Restart your PC and try checking for updates again.
Step 7: Check for Background Apps and Startup Programs
Too many applications launching at startup or running in the background can cumulatively cause high CPU usage.
Shopping ad

- Award-Winning Compact Design & EDC-Ready Gift Choice: Weighing only 0.09 lb and sized like a credit card, this compact laser measure is designed for everyday carry. It slips easily into a pocket, tool pouch, or bag, and can attach to a keychain for quick access wherever you go. Its minimalist design, premium tactile finish, and practical one-button measuring make it a useful EDC gadget for DIYers, real estate agents, homeowners, and tech enthusiasts. A thoughtful gift for men on any occasion
- One-Button Easy Measuring, Simple to Use: Designed with simple one-button operation, this compact laser tape measure makes quick measuring easy without complicated controls. Just press to measure room dimensions, furniture spacing, window height, wall décor placement, and everyday distances around the home. Ideal for users who want a smart, pocket-size measuring tool that fits naturally into an everyday carry (EDC) setup and feels intuitive, modern, and easy to use
- Fast & Accurate Indoor Measurements with Class 2 Laser: Measure distances from 0.16 ft to 98 ft with up to ±1/16 in / ±2 mm accuracy. With quick measurement response in about 0.2 seconds, HOTO helps you check spaces efficiently for home renovation, furniture layout, moving, decorating, craft projects, and DIY planning. Built with a Class 2 laser for everyday indoor measuring; use as directed and avoid direct eye exposure
- Low-Power OLED Display & USB-C Rechargeable Convenience: The low-power OLED display provides clear indoor readings while helping reduce battery drain. With USB-C rechargeable design, auto shut-off, and up to 1000 measurements per charge, this digital laser measure is built for repeated daily use without frequent battery replacement. Compact enough to keep in a drawer, toolbox, bag, or pocket
- Useful for Home, Work & Everyday Projects: From home renovation and furniture measuring to room planning, real estate checks, interior design, and light construction projects, this pocket-size laser distance measure is made for practical everyday use. Compact enough to keep in a drawer, toolbox, bag, or pocket, it is a stylish measuring tool that feels just as giftable as it is useful
- Disable Startup Programs:
- Open Task Manager, go to the “Startup” tab.
- Identify non-essential programs. Right-click and select “Disable” for those you don’t need to launch with Windows.
- Manage Background Apps (Windows 10):
- Go to Settings > Privacy > Background apps.
- Toggle off apps you don’t need running in the background. (Windows 11 has a different approach where you manage individual app permissions).
Step 8: System File Checker (SFC) Scan
Corrupted Windows system files can lead to various problems, including high CPU usage.
- Open Command Prompt as Administrator:
- Search for “cmd,” right-click “Command Prompt,” and select “Run as administrator.”
- Run SFC Scan: Type sfc /scannow and press Enter.
- Allow Scan to Complete: This will check for and attempt to repair corrupted system files. Restart your PC if errors are found.
Step 9: Check for Overheating
While high CPU causes heat, excessive heat can also cause the CPU to constantly try to throttle or struggle, leading to persistent high usage.
- Monitor Temperatures: Use tools like HWMonitor or HWInfo64 to check your CPU temperature.
- Clean PC Internals: If temperatures are high (e.g., consistently above 85-90°C under load), power off your PC, open the case, and clean dust from the CPU cooler and case fans using compressed air.
- Ensure Proper Airflow: Make sure your PC case has good airflow and is not in an enclosed space.
Step 10: Reset or Reinstall Windows (Last Resort)
If all other troubleshooting steps fail to resolve persistent 100% CPU usage, a system refresh or clean reinstall might be necessary.
Recommended Free Tools
- “Reset this PC” (Windows 10/11):
- Go to Settings > System > Recovery (Windows 11) or Settings > Update & Security > Recovery (Windows 10).
- Choose “Reset this PC“. You’ll have options to “Keep my files” (reinstalls Windows but keeps personal files) or “Remove everything” (fresh install).
- Clean Reinstall of Windows: This is the most thorough solution, erasing everything and installing a fresh copy of Windows. Ensure you back up all your important data first! You’ll need a Windows installation USB drive.
Conclusion
Diagnosing and resolving 100% CPU usage on Windows requires a systematic approach. By starting with Task Manager to identify the most resource-hungry processes, and then moving through driver updates, malware scans, system file checks, and ultimately considering hardware or system resets, you can effectively pinpoint and fix what is causing 100% CPU usage. Patience and methodical troubleshooting are key to restoring your computer’s performance and responsiveness.
More shopping ads
Product prices and availability are accurate as of the date/time indicated and are subject to change. Any price and availability information displayed on Amazon at the time of purchase will apply.
Independent reader supportYour contribution helps us test, update, and keep practical guides available for everyone.