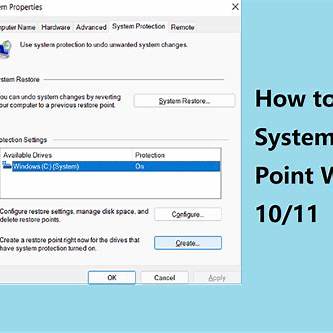
Creating a restore point in Windows 10 is a proactive way to safeguard your system against unexpected issues. A restore point captures the current state of your system files and settings, allowing you to revert to this state if problems arise. Here’s how to create one:
Step 1: Access System Protection Settings
- Open the Start Menu: Click on the Start button or press the Windows key.
- Search for System Protection: Type “Create a restore point” into the search bar and select the matching result. This opens the System Properties window with the System Protection tab active.
Step 2: Enable System Protection
If System Protection is not already enabled for your system drive (usually C:), you’ll need to activate it:
- Select the Drive: In the Protection Settings section, click on your system drive (typically labeled (C:) (System)).
- Configure Settings: Click the Configure button.
- Turn On Protection: In the new window, select “Turn on system protection“.
- Adjust Disk Space Usage: Use the slider to allocate disk space for restore points. A recommended setting is between 5% to 10% of your drive’s capacity.
- Apply Changes: Click Apply, then OK to save the settings.
Step 3: Create a Restore Point
With System Protection enabled:
- Initiate Creation: In the System Properties window, click the Create button.
- Name the Restore Point: Enter a descriptive name (e.g., “Pre-Update Backup”) to identify the restore point later.
- Confirm Creation: Click Create. Windows will begin creating the restore point, which may take a few minutes.
- Completion Notification: Once done, a message will confirm the restore point’s successful creation. Click Close.
Restoring Your System Using a Restore Point
If you need to revert your system to a previous state:
- Access System Restore: In the System Properties window, click the System Restore button.
- Choose a Restore Point: Follow the prompts to select a restore point from the list.
- Confirm Restoration: Review the details and confirm your choice. Windows will restart and apply the selected restore point.
Note: Restoring your system will not affect personal files but will remove apps and drivers installed after the restore point’s creation.
Tips for Effective Use
- Regular Backups: Create restore points before installing new software or updates.
- Disk Space Management: Ensure sufficient disk space is allocated for System Protection to function effectively.
- Understand Limitations: Restore points do not back up personal files. For comprehensive backups, consider using additional backup solutions.


